Sunday, December 17, 2023

Visible Image - Ho! Ho! Ho!

Hey, peeps, it's my turn for a DT post for Visible Image, and I'm still in Christmas mode (and will be till early January - I just keep going while I've got all the Christmas stuff out).

I had these three characters from the Christmas Jumper set already coloured from a previous session, so I just fussy cut them ready for the next stage.

These are the Zig colours I used:

I placed the cut out images on craft cardstock, then masked a small area underneath each image where the Ho!s were going to go.

Then I removed the images and splattered the card with white gouache.

I use a plastic shot glass for the gouache.  It dries out when not in use, but then I just have to spritz a few drops of water to revive it and it's good to go.


made pencil marks roughly where the centres of the images would be then stamped the Ho! sentiment, rotating slightly each time.

My original idea was for the three images to be wobble action, but when it got to the construction stage, there was too much wobble for the size of the images and they were sitting too proud, so I abandoned that and went with setting them at a jaunty angle using foam tape to give them a bit of height and imply movement.

The Christmas Jumper set is such a fun set.  Apart from these images and the Ho! sentiment, you get the jumper and two other sentiments - it's very versatile!  Pop on over to the Visible Image store and have a look!


Sunday, December 03, 2023

Visible Image - Sax It Up!

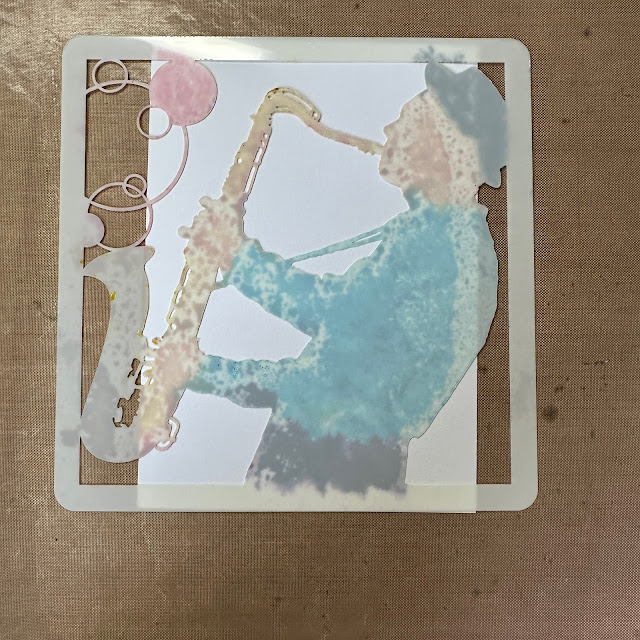
Hello there, it's time for my Visible Image DT post, and today I've got a twofer for you using the fabulous Sax It Up stencil.  I like to ink my stencils to make mono prints, and invariably there's enough ink left after the first print to spritz again and get a second, lighter print.

I used Distress Ink minis to ink up the stencil.  The ink will naturally bead up, and beads up bigger when you spritz it with water.  Once spritzed, I flipped it and laid it on my card, covered it with a piece of kitchen roll and squashed the beading down.
If you've spritzed enough water, once you squash the stencil down, the spritzed ink will spread along the stencil to give a complete image.  It was still a little patchy, as you can see through the stencil, but it still gave a decent print.  And there was enough ink left on the stencil to get a second print.
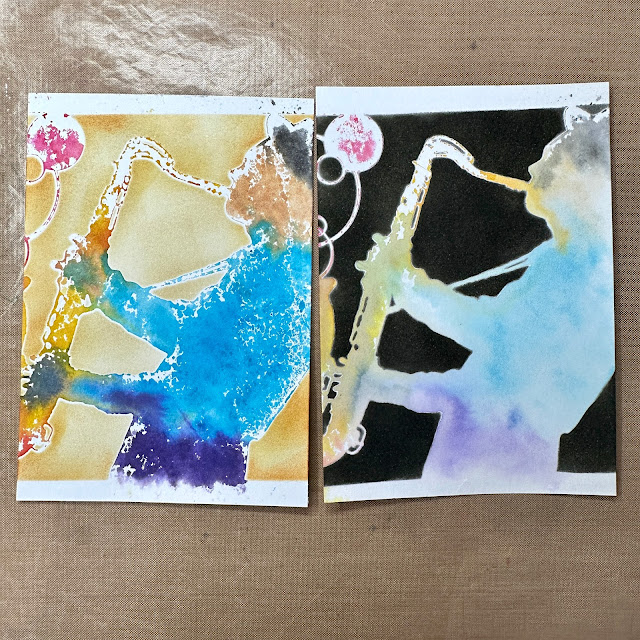
This time the watered-down ink spread further, and gave a paler print.  I forgot to take photos of the prints before I added the backgrounds!
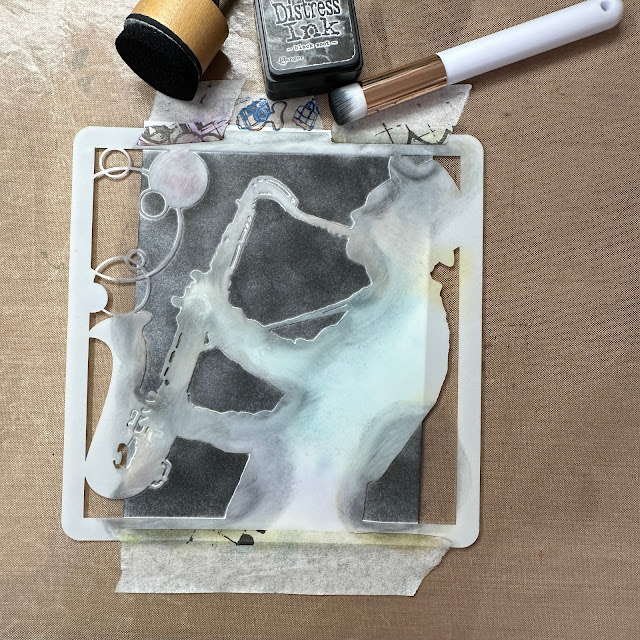
I replaced the cleaned stencil back onto the first print and sponged Antique Linen and Rusty Hinge distress inks onto the background.  

On the second print, I blended Black Soot distress ink.
I couldn't get a black enough coverage, so I swapped to Distress Oxide and got a really good black.
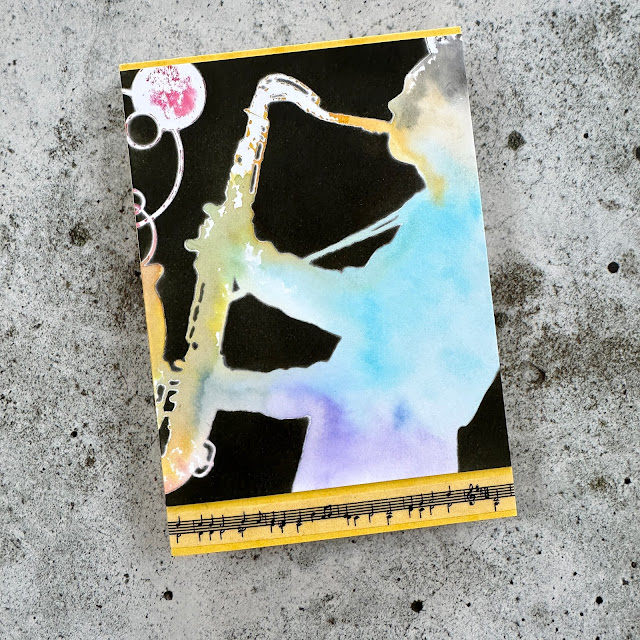
So then it was a case of trimming and mounting the panels to make cards.
I like how (some of) the mottled parts of the image imply highlights, and how the purple of the trousers bleeds into the white border on this card.  And the golden glow of the background.
The solid black background balances well with the loose colours on this print.  I trimmed away the white borders at the top and bottom and mounted it onto yellow card to pick out the yellow highlights, and added a strip of music washi tape at the bottom.

Did you notice that I didn't use the full width of the stencil?  Don't be afraid to crop images to fit your card, it gives the impression of zooming in on the subject.


You can get this and other fabulous stencils at the Visible Image store, pop on over and have a look!


Thursday, November 23, 2023

Seize The Birthday - Fall items

Hi folks, it's time for a new challenge at Seize the Birthday - in fact, it's our last challenge until the New Year.

I've gone for chrysanthemums.  My dad used to grow them in the garden, and I always loved the bronze coloured ones.

The diecut flowers are Tim Holtz, as is the mica-sprayed background.  I only made this in October, but for the life of me I can't remember how I coloured the chrysanths!  I can see that I dipped them into something on my craft mat, so I'm guessing it was probably Jack o'Lantern and Bubbling Cauldron mica stains, then Flickering Candle painted on the centres of the daisies.

Pop on over to the Seize The Birthday blog for some more fabulous inspiration from our surprise party guests and the rest of the design team, and play along with us!

Sunday, November 19, 2023

Visible Image - Purple Snow


Well, if it's good enough for Prince, it's good enough for me!

Hi there, it's my turn for a design team post for Visible Image, and I wanted to make a colourful snowflake card using the Snowflake Grunge stamp.  I already had a batch of half-snowflakes stamped out, so I looked for a stencil that I wanted to use, and settled on Scribble.

I used Wilted Violet Distress Oxide for a smooth blend.

Then softened the top section with Milled Lavender Distress Oxide because it looked a little too bold.

For a bit of contrast I stamped some of the Grunge Tones stamps around the edges and added the Snow sentiment.

Now for the snowflake.  I used Jane Davenport Glitz-Sea Sparkle Paint Marker in Southern Ocean (purple to you and me), and added a few random dots.

It's got a lovely shimmer to it when the light catches it.

Here's the finished card with the Visible Image products used.


Pop on over to the Visible Image shop because they've got some fabulous Black Friday offers, and you can pick up some real bargains!

Happy Sunday!

Thursday, November 09, 2023

Seize The Birthday - Neutral Colours Only


Hello, it's Ashwini's turn to choose a topping at Seize The Birthday, and she's gone for Neutral Colours Only.

I went for a chocolate coloured chocolate cupcake - let's not talk about the lemon :)  But you can use metallics, so I did!

I painted the case in Gansai Tambi Yellow Gold.  And added a few gold splatters, as you do.

Pop on over to the Seize The Birthday blog for some more fabulous neutral inspiration from the rest of the design team and our surprise party guests, and play along with us.  If neutrals aren't your colours, you can still play along with any birthday-themed project.

See you in the gallery!


Sunday, November 05, 2023

Visible Image - Two Cheers!

It's my turn to share a Design Team blog post with you, and I've gone for a masculine card using the Bring On The Beers set.  Most of the menfolk I know prefer clean and simple cards rather than lots of layers, colours and detail.  So, a CAS card - I'm all for that!

I started by stamping the glass just off the edge of the card, angled towards the centre.  

I masked that, then stamped another glass overlapping as though they were clinking for cheers.

Here's the card with the mask removed.  I could have used the coordinating dies, which would have been quicker and easier, but I wanted to mask and layer the images.

Then I set about watercolouring the glasses with Rusty Hinge Distress Ink, and Lost Shadow for a hint of shading on the glass top and foam.

I positioned the Happy Birthday sentiment so that I could add bubbles above and below it.

The first inking of the bubbles with Rusty Hinge was too dark and sharp, so I stamped it off and spritzed it to give it a more watery, beery look.  Much better!


I mounted the panel onto shimmery bronze card and called it done.


Varying the shading on the glasses adds to the translucent effect.


Uneven spritzing of the bubbles gives them an organic look.


Stamping off the edge invites the eye into the card and implies movement, as if the glasses are being raised towards you.  If the glasses were full images in the centre it wouldn't have the same impact.


Cheers!


You'll find these, and other fabulous stamps, in the Visible Image store.  Go on, treat yourself to an early Christmas present!

Thursday, October 26, 2023

Seize The Birthday - Add A Sky


Hello, the new challenge for Seize The Birthday is up, chosen by Vicki, and it's Add A Sky.


Every once in a few years, I get out all my encaustic waxes and craft iron, and have a session.  It's not the kind of process where you can just make one card, so I sit there and iron a batch of images while everything's out, then put it all away again for a few more years.  I end up with several scenes ready to make into cards.  Here are a few more that I've just made up from my last ironing batch:


Anyway, enough of my encaustic wax cards, why don't you pop on over to the Seize The Birthday blog for some more fabulous cards with skies from the design team and our surprise party guests, and play along with us.  If you don't want to include skies, you can play with any birthday-themed project.

See you in the gallery!

Sunday, October 22, 2023

Visible Image - The Right Direction


Hi peeps!  I've been playing with The Right Direction stamp set, which has a couple of fabulous Ford Capri images.  So retro, and perfect for masculine cards.


I wanted to make it in a modern, graphic style to include the skyscape so I went with Warholesque primary colours and repetition.  

Then decided on the placement.


I didn't want the skyline to be central behind each car so I alternated the position as I stamped.


But it didn't look balanced, so I stamped in the gaps to make a continuous skyline behind each car.


Much better!  Here's a close up.


Loving the private plates!


Pop on over to the Visible Image store where you can find loads of fabulous stamps, coordinating dies  stencils, with loads of inspiration for each set.  There are some brilliant offers on too!